|
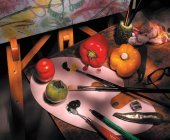
Photography WorkshopThis photography workshop is on how to take some unusual photographs. The image was shot for a calendar. This technique is known as "Painting with light."

Apart from the camera, (which should have 'B' (bulb) exposure setting) on a very sturdy stand, we need just one source of light, which can be an ordinary torch or we can even use an incandescent bulb or a light from a table lamp. We should have some provision to control any spill of light. For that, we can make a cone from a thick paper or a card board.
First, we have to compose the subject and then switch off all lights of the studio or the room. Be sure no light is entering the room from outside. Now set the camera on any aperture. Choice of setting of the aperture will depend on how much depth of field we want.
Put shutter speed on 'B' and click open the shutter. As there is no available light, the image will not be exposed. To expose the image, take the light source (a torch or bulb) and start "painting" the area which is to be enhanced. Keep the hand moving to avoid any hot spot. "Painting" time will depend on what aperture we are shooting at, distance of the light from the subject, how powerful is the light source and the ISO setting of the camera. Trial and err is one way to get a well balanced exposure, but if we want to do this methodically, hold the light at about one foot from an exposure meter and then take exposure reading for the hand held light for the aperture and ISO, we have set. Suppose we get the shutter speed of five seconds, then we have some idea that we have to burn a particular area for about five seconds. In such case, distance of the light from the subject must be maintained at one foot. If we go closer, then we will burn that area more rapidly, resulting in an over exposed spot, and vice versa. We may need to expose lot of pictures to find a good, well balanced exposure, as with each exposure, we may get one part or other, either more high lighted or under exposed. This technique can be used for architectural photography at night. Basic theory remains the same but we may need much powerful light as you have to increase the distance to may be twenty or thirty feet. For this, we can also use a small portable flash light. White balance setting of the camera should be set as per the kind of light we are using. - Photography workshop
Read about other photography tips
|